Everything you need to know about needles for your sewing machine
Your sewing needle might not be something you’ve given much thought to, but it’s a critical part of your sewing machine and if the needle is blunt, damaged, installed wrongly, threaded wrongly, or the wrong size for your project then you simply won’t get good results when you sew.
Many new sewers will just continue on sewing until their needle breaks and it’s only then that a new one is installed. But that’s usually far too late and you can have unexpected and niggling problems with your sewing if a needle change is overdue.
So let’s have a look at everything we need to know about the needles we put in our sewing machine.
What are the basic functions of a sewing machine needle?
- To make a passage in the fabric for the thread to pass through. Notice I didn’t say hole. Some needles are designed to pass between the threads of the fabric rather than penetrating them, for example when sewing knit fabrics.
- To carry the top thread through the fabric where it can be caught by the hook mechanism in the bobbin area of your machine, and form a stitch.
- To work quickly without overheating.
What are the parts of a sewing needle called?
A sewing needle is actually more complicated than you might think. There is a lot more to the design of the needle than just a metal shaft with a point and a hole in it. To sew quickly, efficiently and correctly, to catch the bobbin thread and form a stitch, and to allow the smooth passage of the thread, there are several features built into the needle that makes it work.
Different types of needles also have slightly different features depending on what they are designed to do or the fabrics they are designed to work with. But with needles being so small, these differences might escape your notice unless you look at them very carefully.
For example, the point on a needle for knit fabric is different from that for woven fabric, and different again to a ‘universal’ needle. But more on that later when we look at the different types of sewing machine needle and their uses.
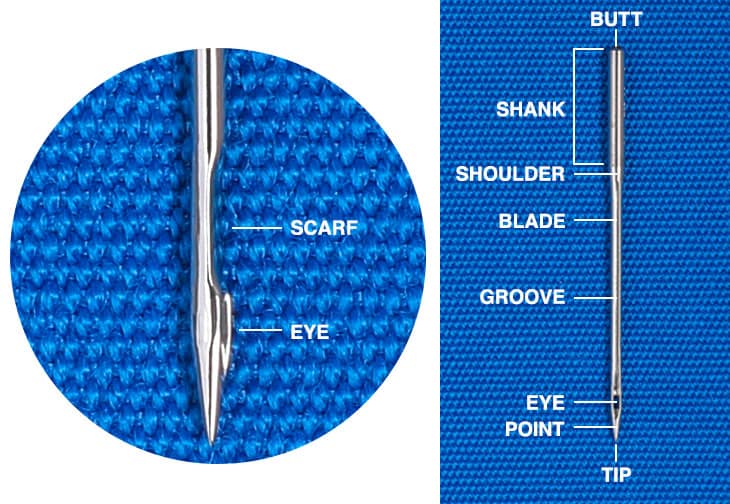
Butt – the rounded end of the needle opposite the point. This helps the needle locate properly inside your machine.
Shank – Thicker top of the needle that inserts into the machine and is held by the needle clamp or set screw; for most home sewing machines this has a round front and flat back, which seats the needle in the right position. It supports the needle as a whole by providing additional strength.
Shoulder – The intermediate section between the shank and the blade or shaft.
Shaft or Blade – Body of the needle below the shoulder to the point. The shaft thickness determines the needle size. This part of the needle is subject to the most friction and therefore heat. It’s this part of the needle where any bending or flexing can take place and eventually where it will break.
The Long Groove or Front Groove – If you have never noticed before there is a long groove the goes down the front of the needle. You can feel the groove by running your fingernail, or something sharp like the pointed part of a seam ripper, down the front of the needle. I’ll bet most of you never saw it or knew it was there. That front groove on the needle is another critical part for correct stitching.
When the needle goes down through the fabric, the thread lays into that groove. The size of the needle and thread must coordinate so the thread fits appropriately into the groove. If the needle is too small, or the thread is too thick, (there is a mismatch between thread and needle size) the thread will not fit into the groove and the stitches will not form correctly. You may even think there is a tension problem or you may get shredding of your thread.
The Scarf – On the back side of the needle around the eye is a magical little indentation called the scarf. The scarf allows the sharp hook in the bobbin case area of your machine to get closer to the loop of thread as it spins. It gets so close to the needle that it almost touches; there is an infinitesimally small clearance between the two. If the needle is bent, even slightly, the hook could miss catching the loop, resulting in skipped stitches. This is what happens when you force a needle through layers that are too thick. The needle bends (or flexes) just a little, the hook misses the scarf and doesn’t make contact with the thread, so a stitch doesn’t form and you see a skipped stitch on the top. A long scarf helps eliminate skipped stitches by allowing bobbin hook to loop thread more easily. A shorter scarf requires a more perfectly timed machine.
Eye – Hole at the end of the needle through which thread passes, usually from front to back. Needle size and type determine the size and shape of the eye. The thread here is taken to the bottom of the fabric to create the stitch. Correctly matching thread weight to the size of the eye is important.
Point – Needle tip that penetrates fabric to pass thread to bobbin-hook and form the stitch. The shape of the point varies among needle types.
What do the numbers mean on a sewing needle?
Sewing machine needles will often have two sizes on them. For example 80/12. Both numbers mean the same thing and refer to the size of the needle shaft or blade. There are two commonly used sizing systems. The European sizing system gauges the needle diameter in fractions of a millimeter, while the American size is a smaller number. The smaller the number in either European or American sizing, the finer the needle.
Under the European sizing system, 110 equals 1.1mm thick at the shaft. 80 equals 0.8mm, and so on. A higher number is a thicker needle. The American system just uses a number but that number doesn’t represent any measurement other than to refer one needle size to another. The higher the number, the thicker the needle. Depending on the manufacturer, you may find a needle size listed as 90/14 or 14/90. The order of the numbers does not affect the size.
| American | European |
| 8 | 60 |
| 9 | 65 |
| 10 | 70 |
| 11 | 75 |
| 12 | 80 |
| 14 | 90 |
| 16 | 100 |
| 18 | 110 |
| 19 | 120 |
Size 80 or 12 is the middle size for average cotton fabric and most general use needles come in this size as standard. Heavier fabrics use a larger size and lighter fabric can use a smaller size.
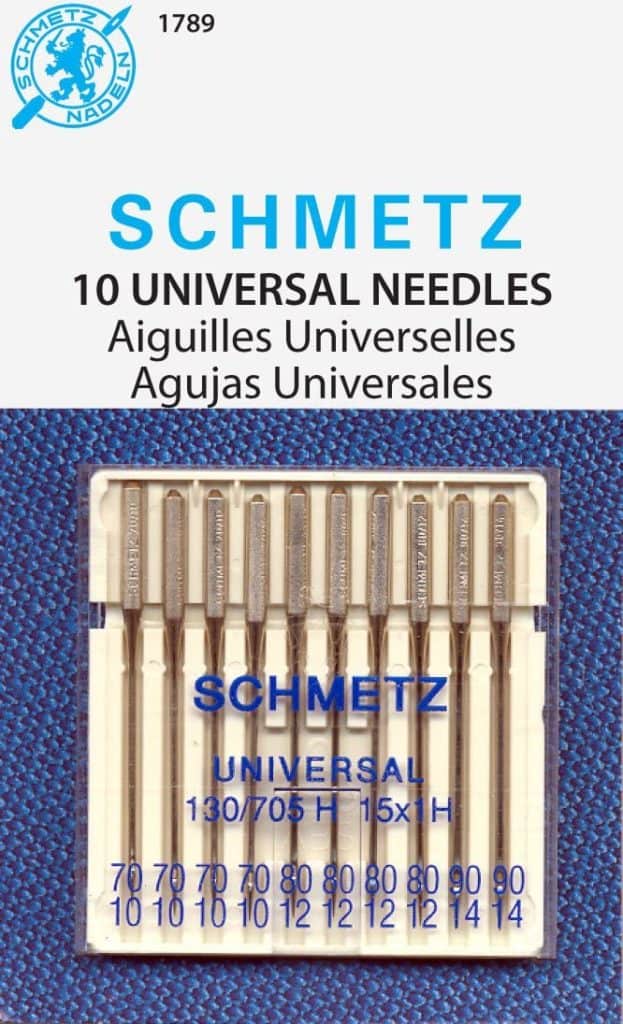
Buy needles in all types of packs
I love Schmetz needles and always buy this brand. They do all sorts of handy packs you can buy such as this pack which is an assorted set of universal needles in sizes from 70 to 90, the ones you’ll probably use most often. You can also get packs with needles all the same size if you want a pack of 10 universal size 80 for example. Or variety packs with universal, jeans needles and a twin. Sewing a lot? Get the boxes of 100 to last for years!
See some of the pack options here and stock up so you never run out.
Choose your needle size based on the type and weight of thread that is being used as well as the fabric that is being sewn. The goal is to have the needle slide easily through the fabric without damaging the fibers or creating too large of a hole, and to carry the thread smoothly without damaging it when sewing.
Basic needle sizes are as follows, as a general guide.
- For very fine or lightweight fabrics: use size 60/8 or 65/9
- For lightweight fabrics: use size 70/10 or 75/11
- For medium weight fabrics: use size 80/12 or 90/14
- For heavyweight fabrics: use size 90/14 or 100/16
- For very heavy fabrics: use size 110/18
Here are some more specific examples:
- 60/8 – used for very fine fabric like lingerie, silk and fine lace.
- 70/10 – Net, Chiffon Lingerie, silk and cotton
- 75/11 – Voile, Chiffon, Organza, Denim, Satin, Sweater, Silk, Dress Shirt, Lycra, Spandex etc.
- 80/12 – Tricot, Silks, Canvas, Quilting cottons
- 90/14 – Syn Velvets, Poplin, Linen, Light Wool, Jersey, Muslin etc.
- 100/16 – Denim, Heavy Suiting, Corduroy etc.
- 110/18 – Heavy Denim, Leather, Upholstery Fabric, Faux Fur etc.
- 120/20 – Super heavy fabrics: Cord, Denim, Heavy Suiting
How to match your thread weight and needle size
Here’s a quick way to determine if the thread and the sewing machine needle are compatible:
- Take half a yard/metre of the thread being used on the machine and thread it through the eye of a loose needle.
- Hold the thread vertically with the needle at the top. Let go of the needle and watch how it falls.
- If the needle is too big, it will drop easily to the bottom of the thread
- If the needle is too small, it will stick at or near the top of the thread
- If the needle is the right size, it will slowly spiral to the bottom of the thread
The general guideline is that the thread should fill 70% of the eye of the needle. While this is a handy guide, a larger-than-normal needle may have to be used to penetrate thicker fabric, or stitch over the top of pronounced or bulky seams.
What do the colors on sewing machine needles mean?
Most, but not all, brands of household needles now have two bands of color. The top color band indicates needle type and the lower color band indicates needle size. A basic universal needle and some specialty needles will only have the one band of color, signifiying the needle size. The colors are usually much easier to see than the etched in numbers, especially if you are over 40 or wear specs like I do.
Here is the current color chart from Schmetz needles just in case you have a needle in your machine or poked into your pin cushion and can’t remember what it was. That can happen if you are switching from knit to woven fabrics, and from light weight to heavyweight fabrics. You don’t want to sew your favorite fine knit fabrics with a denim or jeans needle by mistake!
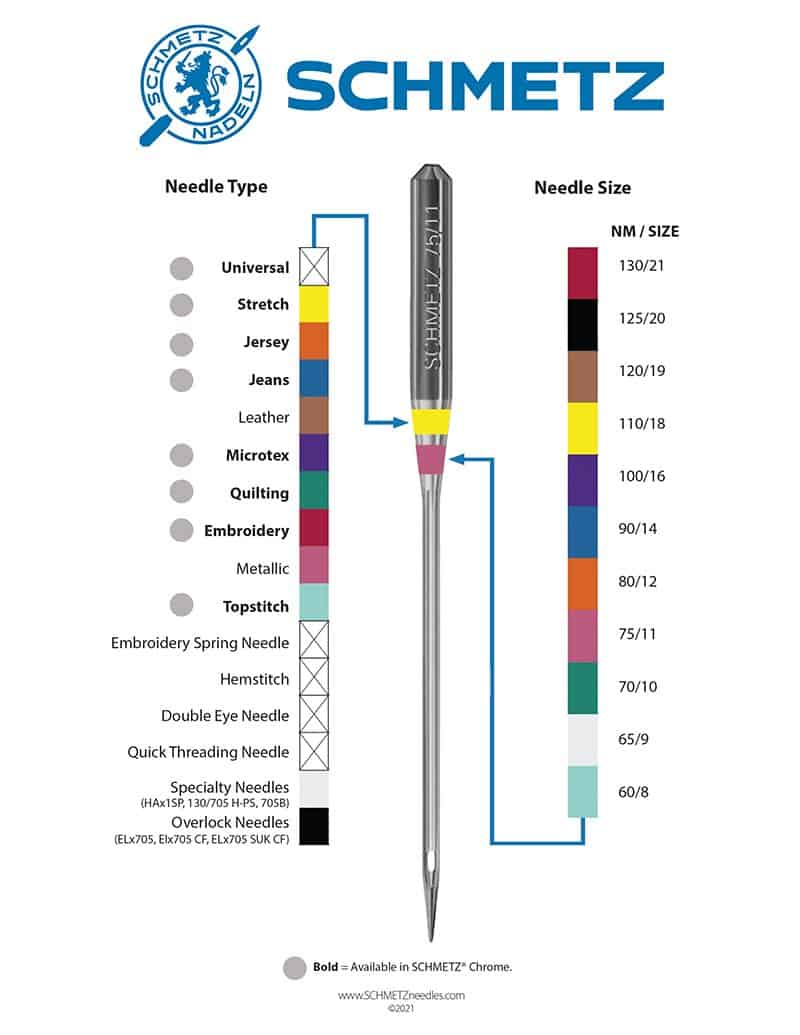
You can download a copy of this sewing needle color chart so that you can print it and keep it with your sewing notes, or hang it on the wall next to your machine. Download needle color chart here.
The needles from Singer follow a slightly different system. Of course, why make it easy when it can be complicated! But basically the same applies. The top color is for needle type and the lower color for needle size.
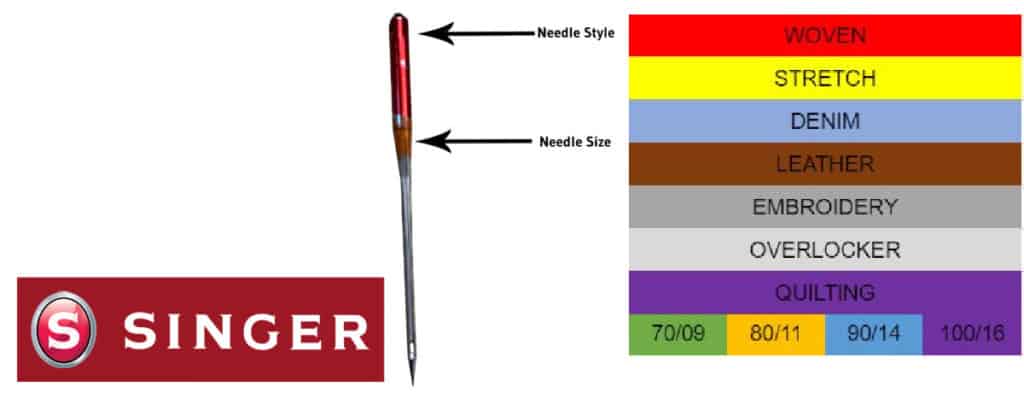
If your needle is from another manufacturer, you may need to check the original needle packaging or the manufacturer’s website for a table to remind you of the color meaning. Make a note of it in your sewing journal so you can always identify what needle you have in your machine.
What types of sewing machine needle are there?
As well as sewing machine needles being available in different sizes, there are also other variations that can be made during the needle manufacture to change certain characteristics and make a needle more suited to one application over another. Different fabrics is an obvious one, with different needles being made for woven or knit fabrics, with the point of the needle being different. Needles can also be made to accomodate different types of thread including for embroidery or for metallic threads.
The most common types of needle points are sharp, ballpoint, and universal.
- Sharp needles are for all woven fabric. The sharp point is especially helpful when sewing straight lines and for tasks such as tops stitching.
- Ballpoint needles are designed for knit fabric so that the point glides between the loops of a knit fabric without disturbing the fibers of the fabric, or breaking them, potentially causing a knit fabric to unravel. Ballpoint needles do not form as straight stitching as sharp needles. The non-straight stitching is more apt to give with the fabric.
- Universal needles can be used with woven or knit fabric. The point of a universal needle is sharp yet also slightly rounded, giving it the characteristics of a sharp and a ballpoint needle combined. If you are not happy with the stitches your machine is forming, try switching the needle to either a ballpoint or sharp as appropriate.
There are also other specialty needles that can help you sew better results for particular tasks or situations:
Stretch – designed for sewing with knit fabrics that stretch, a stretch needle has a ballpoint end to slip between the fibres of a knit fabric rather than penetrate or pierce them. A stretch needle will usually have a smaller eye. If a ballpoint needle is giving you skipped stitches on lycra fabrics, try switching to a stretch needle.
Embroidery – All-purpose embroidery needles have a slightly rounded point and smooth eye to help slide through knit or woven embroidery fabrics without cutting or slicing through threads that have already been stitched out in the design. You may also find speciality embroidery needles with a larger eye and groove to accommodate thicker embroidery threads like wools. A chromium needle is recommended for embroidery machines. These needles are designed to sew at high speed without heating.
Metallic – Specialty needle with a longer eye engineered to sew or embroidery with metallic or specialty threads. If you’ve struggled with metallics before and blamed the thread, do try again with this specialty needle for trouble-free embellishment with these beautiful but sometimes fragile threads
Denim or Jeans – Jeans needles have a long, slender sharp point to penetrate thick tightly woven fabrics like denim. But denim needles aren’t only for sewing denim. These needles have an extra sharp point and stiff shank, making it a strong needle for sewing tough fabrics and through many layers of fabric.
Microtex sharp – A very slim needle with a thin shaft that helps make very straight stitches. It was developed for the modern micro-fibres and polyesters and high thread count, high-quality fabrics used today. The point is very sharp — thus the name — but because of this it is a bit more fragile and needs to be changed more regularly. This is a great needle for piecing high thread count fabrics like Batiks, silks, and microfibers. It is also used for beautiful topstitching or edge stitching.
Leather – Leather needles have one sharp edge made to help cut through non-woven thick material such as leather and artificial leathers. These can be helpful for sewing with several layers of vinyl for bag-making.
Top stitching – Has an extra large eye and large grooves to accommodate thicker topstitch thread. This needle helps stitch perfectly straight lines and even stitches.
Double-eye needle – Used for embroidery and topstitching with decorative threads to produce decorative seams. They have two eyes, one right above the other. Two different threads can be used for shading and texturing effects.
Quick threading or self-threading needle -A general purpose needle with a slip-in threading slot for people who have difficulty threading needles. These needles are helpful for children, those with vision problems, or those having difficulties with fine motor coordination resulting from arthritis or other conditions.
How to replace the needle in your sewing machine?
If you buy a new machine it will usually come with a universal needle already installed. This is used when the machine is tested and then left for you to start sewing immediately you unbox your new machine. But the needle is a replaceable part and needs to be replaced quite frequently for best sewing results. See the section lower in this article for how often to replace your needle.
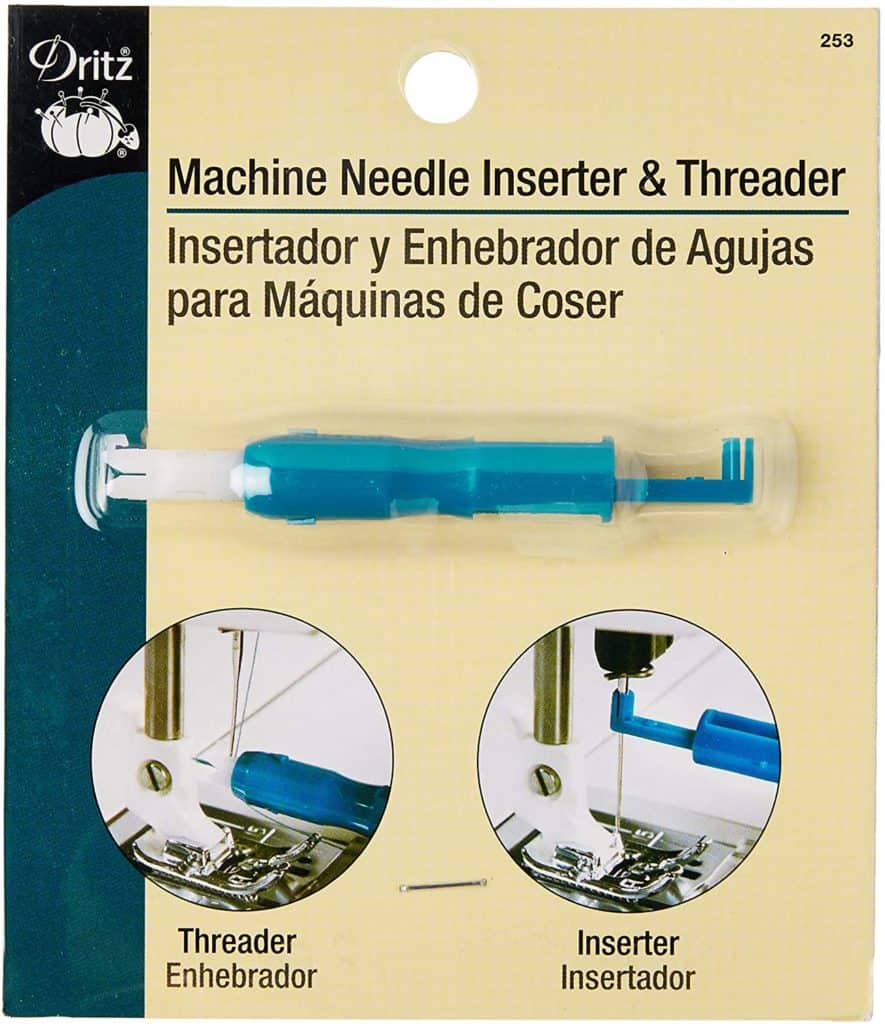
Sewing essential!
I recommend this handy little tool for changing your sewing machine needle. Makes it so much easier, especially if you have dexterity or eyesight issues. The tool holds the needle for you to push it up into the machine more easily. Also includes a simple locate and push needle threader that works just great with machine needles. Slide it down the groove until it meets the eye and then press the thread through. You’ll love it!
Always refer to your sewing machine manual for the correct way to insert the needle into your machine.
- Carefully remove the old needle and dispose of it safely. It can be handy to keep an old pill bottle to dispose of old or broken sewing machine needles.
- Select a needle of the correct size and type using all of the information you’ve learned above
- Install it into the machine according to manufacturers instructions. For a regular household sewing machine, this is usually with the eye of the needle facing front to back and the flat part of the shank of the needle facing towards the back of the machine. Remember ‘flat to the back’.
- Make sure the needle is pushed all the way in to the holder as far up as it will go, and secure it in place with the needle clamp or screw. This is important.
- After inserting a needle in the machine turn the machine hand wheel manually to make sure the needle isn’t contacting any parts of the presser foot or bobbin plate.
How can I tell which needles will fit my machine?
Most home machines use the common needle system 130/705 H, but there are some speciality machines (perhaps sergers or embroidery machines) that might use a different system so if you suspect this is the case for your machine, check your machine’s owner’s manual or ask your machine dealer. If you have a special machine you’ll probably already know if this applies to you.
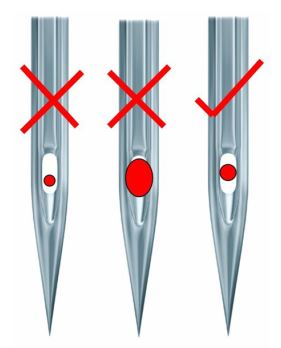
How can you tell if the needle is blunt and needs changing?
The change will be quite subtle to start with as you needle starts to go blunt, but after a while you’ll hear that the needle is overdue and needs changing. As the tip rounds off and isn’t as sharp, it takes more effort for the needle to pass though the fabric and you’ll hear a clunk or thud thud noise as it sews. The motor is laboring just that little bit harder to push the needle through your fabric.
You may also see that the needle starts to pull small threads in the fabric, or you’ll see skipped stitches where the bobbin thread didn’t catch. Or perhaps you’ve noticed your thread is breaking or shredding a little. That can be a warning sign too.
If you have a good magnifying glass you can compare the tip of the old needle to a new one and see quite a difference! I’ve also read that you can test a sewing machine needle by pulling the tip lightly over some stretch hosiery. If it snags the thin nylon, there are burrs on the tip of the needle and its ready to be replaced.
How often should you replace the needle in your sewing machine?
Advice on this varies. I’ve seen the following examples used as a guide for when you should change your sewing machine needle:
- After 8 hours of constant sewing time.
- After sewing 3 complete bobbins of thread
- If you notice fabric is snagging or puckering
- Any time the tip may be damaged by hitting a pin or the presser foot
I’ve also read that you can test a sewing machine needle by pulling the tip lightly over some stretch hosiery. If it snags the thin nylon, there are burrs on the tip of the needle and its ready to be replaced. I’ve not tried this one personally but it sounds reasonable.
Download this article as a PDF
This article has been converted to a print-friendly PDF file to make downloading, saving and printing it easy. It’s available for optional purchase for your convenience.
Was there something that I missed?
I think I’ve pretty much covered everything there is to know about sewing machine needles in this very long article. I hope it’s been useful. Did I miss something? Let me know in the comments below. I always love to get your feedback and hope you’ll add in any of your own tips and tricks for the readers.
Please do also help me get the word out about this new sewing site by sharing one of the images below onto your Pinterest boards. Or maybe share more than one, you’ll make my day, thank you. Don’t forget to post a link into your favorite sewing groups too.

A friend said some machine sewing needles are facing the left, and I have always had my sewing needles facing front only. I have never heard of it, and am curious if this is true on any sewing machine in history or ever…
Thank you,
Sherry Combs